LinkedIn ads are a powerful tool for reaching your ideal audience. But are you truly maximizing their potential? Traditional tracking methods, relying on pixels from the user’s browser, can be hampered by ad blockers and evolving privacy regulations. This is where server-side tracking via Google Tag Manager (GTM) steps in, offering greater accuracy and control over your LinkedIn data.
Why Server-Side Tracking Matters
- Improved Data Accuracy: Bypass browser-based limitations for a clearer picture of your ad performance.
- Enhanced User Privacy: Respect user privacy while still gathering valuable conversion data.
- Greater Control: Manage and modify your tracking setup without touching website code.
Setting Up LinkedIn Conversions with Server-Side GTM
Don’t worry, it’s easier than it sounds! Here’s a simplified breakdown:
1. Laying the Groundwork (GTM)
We are assuming that you already have a Server-Side GTM container setup in which you are going to configure the LinkedIn Conversion API. If you did not, read more about setting up Server-Side GTM here.
2. The LinkedIn Side of Things
To get started, the LinkedIn Insights tag does not have any Server-Side counterpart. This tag needs to be implemented client-side in order to set 3rd party cookies, and to store the LinkedIn Click ID in a cookie. Storing the Click ID in a cookie is something you can also do yourself, which in that case would make the Insights tag obsolete. This article will explain how you can setup Server Side Conversion tracking for LinkedIn.
The setup requires two things:
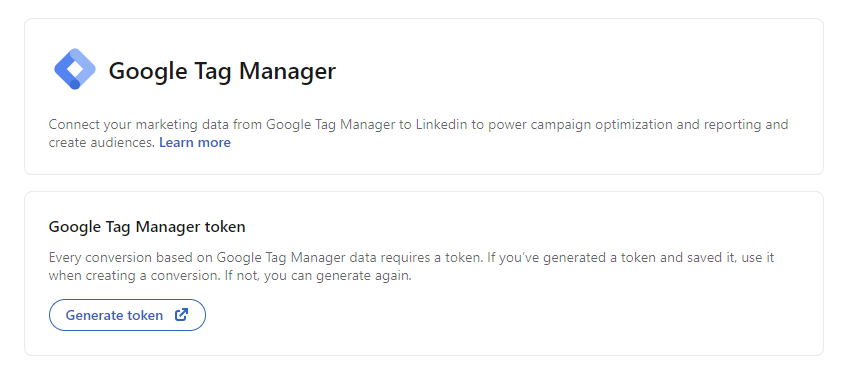
- LinkedIn API Access Token: This token can be retrieved within the LinkedIn Campaign Manager. Go to the Campaign Manager overview, go to Analyze > Sources and select Google Tag Manager. On the next page, you should be able to Generate a token via the following button:

You will probably need to validate by logging into your LinkedIn account again to receive the Access Token. Store the token since you will need it later. - A conversion tag: Within the Campaign Manager, go to Analyze > Conversion Tracking. Here you can create a new conversion tag by clicking Create Conversion and select Conversion API.

Fill in the field on the Settings page that will show up; and click Next step.
On the next page, Sources, select “Direct API” and click Next step. On the last step, you can select campaigns to track with this conversion, but you can skip this step for now by clicking Create.
The new Conversion should now show up in your Conversion Tracking page. Click on the name of the Conversion you have just created to go to the Conversion Details page. Capture the ID after /conversions/ from the URL of that page (example below):
https://www.linkedin.com/campaignmanager/accounts/12345678/conversions/17290516
This is your conversion ID. Store this ID, since you will need it later.
3. Back to GTM: Setting Up the Server-Side Tag
There are two templates within the Template Gallery, in this case we will use the Official LinkedIn template (github). There is also a template build by Stape, which might be more tailored to your needs.
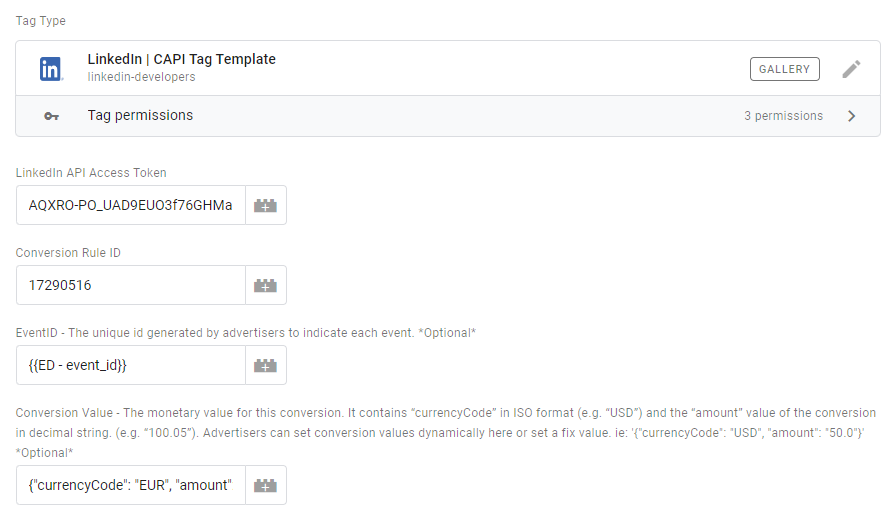
The official LinkedIn template requires the following information:
- LinkedIn Access Token: This is the Token you have created earlier. Paste this token in the field.
- Conversion Rule ID: This is the Conversion ID that you have created. Paste the conversion ID in the field.
- EventID (optional): If you are planning to run LinkedIn tracking in parallel mode (both client- as server-side) you can use this field to make sure conversions get deduplicated. More information about setting up deduplication can be found in the official documentation.
- Conversion Value (optional): You can send over a monetary value with your conversion. The following format should be used (example):
{"currencyCode": "EUR", "amount": "1.0"}
Your template should look something like this:
4. GTM Transformations: Adding required ID’s
LinkedIn conversions can be matched on different data points. One of the following ID’s is required for the tracking for work successfully.
- Sha256 Hashed Email
- LINKEDIN_FIRST_PARTY_ADS_UUID, which is the click ID from LinkedIn (li_fat_id) in the URL
- Acxiom ID
- Moat ID
You can send more data points like firstName, lastName, etc. for even better matching results. You can send this data together with the Client Side GA4 tag towards your server. However, you can also use a Transformation within GTM to read the value of the li_fat_id cookie and add it into your LinkedIn tag. For example:

We decided to store the li_fat_id cookie value in a server side (HTTP Only) cookie to be able to capture this data for a longer period. You can use a Server Side Template like “Cookie Monster” for this. If you are using the Client Side LinkedIn Insights tag together with this Server Side solution, make sure to give the cookie a different name, for example sst_li_fat_id. If you name it li_fat_id, the client side script will set a cookie with this exact name on the subdomain which will “overwrite” your top-level domain cookie when reading the cookie value in GTM.
4. Testing, Testing, 1, 2, 3!
- Simulate Conversions: Trigger your events manually within the GTM Preview mode to test your setup.
- Verify Data Flow: Check your server-side GTM debugger and LinkedIn’s conversion analytics to confirm data is flowing correctly.
The template has logs build in so you can see why your hits might be failing, for example if you did not send one of the required ID’s:

Congratulations! You’ve successfully implemented server-side tracking for your LinkedIn conversions. You can now enjoy more accurate data, enhanced privacy, and greater control over your ad campaigns.
Need help navigating the technical details? Don’t hesitate to reach out to us via analytics [@] groupm.com


Leave a Reply
You must be logged in to post a comment.