
Adding Optimizely data to Google Analytics has a few benefits. First of all, you can verify Optimizely’s results in GA, which is always a good thing. By segmenting Optimizely-tested users in analytics, you also open up a world of extra reports, metrics and visualisations, that you won’t find in Optimizely. You won’t have to create goals for each funnelstep anymore, you can just view the funnel dropoff for your tested users right there in Google Analytics.
After improving Visual Website Optimizer’s GTM integration, I thought the same should be possible for Optimizely. While Optimizely’s Google Tag Manager integration works pretty well, it’s not exactly an easy process to set up. Optimizely requires you to change your Google Analytics tracking code and preferably set a fixed tracker name. If you don’t want to (or can’t) change your GA tracking code, or you’re using GTM’s built-in pageview tag, you’re kind of out of luck. Even if you do get it to work, you’re going to have to remember to enable the integration for every test you start. If you’re like me, you’ll forget that every single time.
So what you really need is a ‘set it and forget it’-tag, that just does its thing and doesn’t get in your way. Luckily, for most use-cases, that’s pretty easy, because Optimizely provides us with all the information we need in their javascript object.
Getting the correct Optimizely data
The first thing you need, is a GTM Custom HTML Tag that gets the relevant data from the Optimizely javascript object:
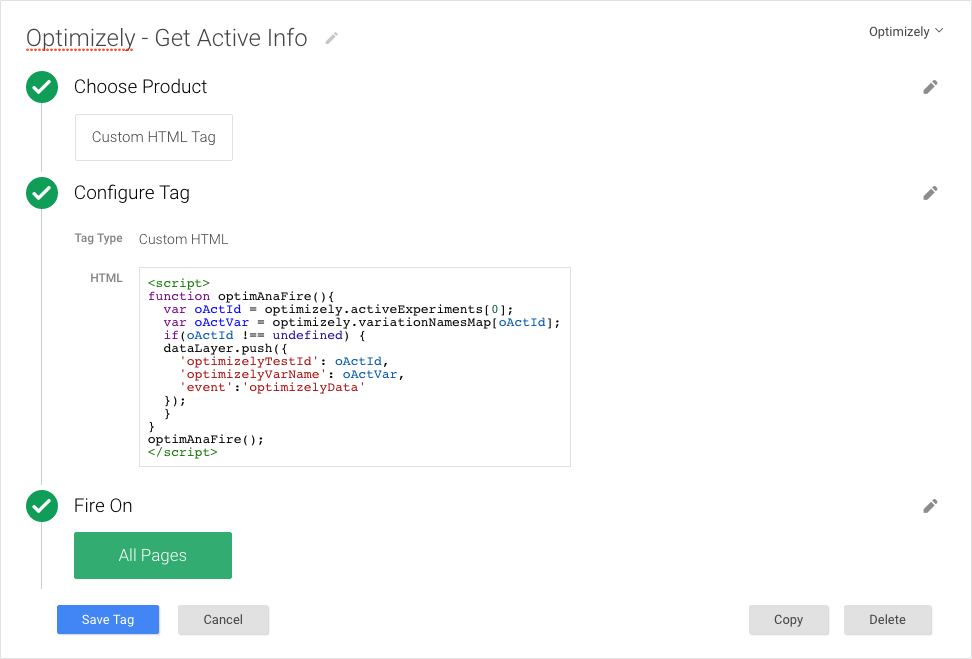
<script>
  function optimAnaFire(){
    var oActId = optimizely.activeExperiments[0];
    var oActVar = optimizely.variationNamesMap[oActId];
    if(oActId !== undefined) {
    dataLayer.push({
      'optimizelyTestId': oActId,
      'optimizelyVarName': oActVar,
      'event':'optimizelyData'
    });
    }
  }
  optimAnaFire();
  </script>
Fire this tag on all pages, and if there is an active test on the page, the optimizelyTestId and optimizelyVarName are added to the GTM dataLayer. If you run in to issues getting the data in the dataLayer, the object data might not be ready yet. In that case, create a timed trigger for this tag, firing it after a few hundred miliseconds until you get results.
Getting the A/B test data to Google Analytics
Once you have the dataLayer variables for your active test, you need to add everything to Google Tag Manager. You’ll need to create 2 variables, so you can use the dataLayer information in other tags, a trigger that fires when the Optimizely data is added to the dataLayer and a tag that actually sends the data to Google Analytics.
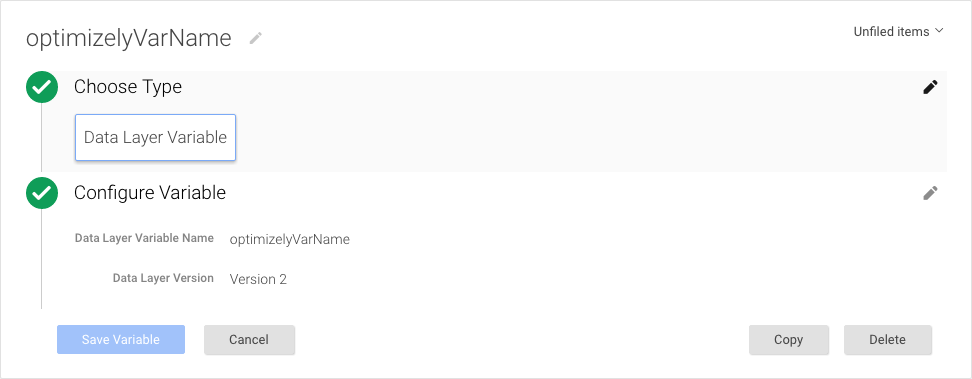
Let start with the variables: Create 2 variables, one for optimizelyVarName (shown below) and one for optimizelyTestId, both are Data Layer Variables:
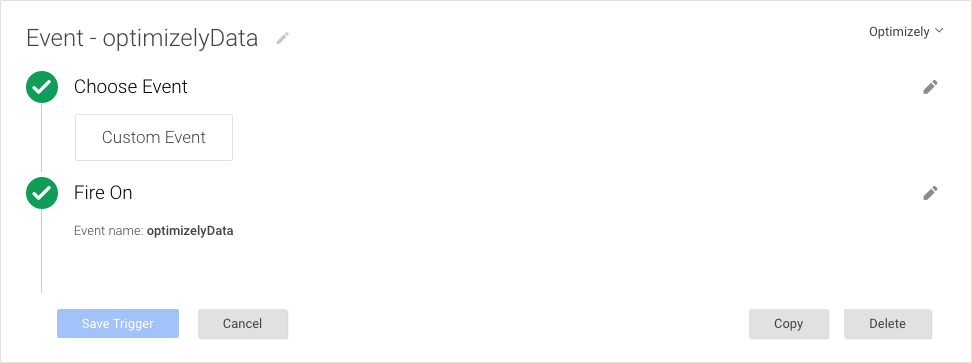
Next up, the trigger: When the first Custom HTML Tag adds the relevant data to the dataLayer, it also ads an event called optimizelyData. Create a new trigger that fires when this happens:
Almost there, now all we need to do is send all this information to Google Analytics:
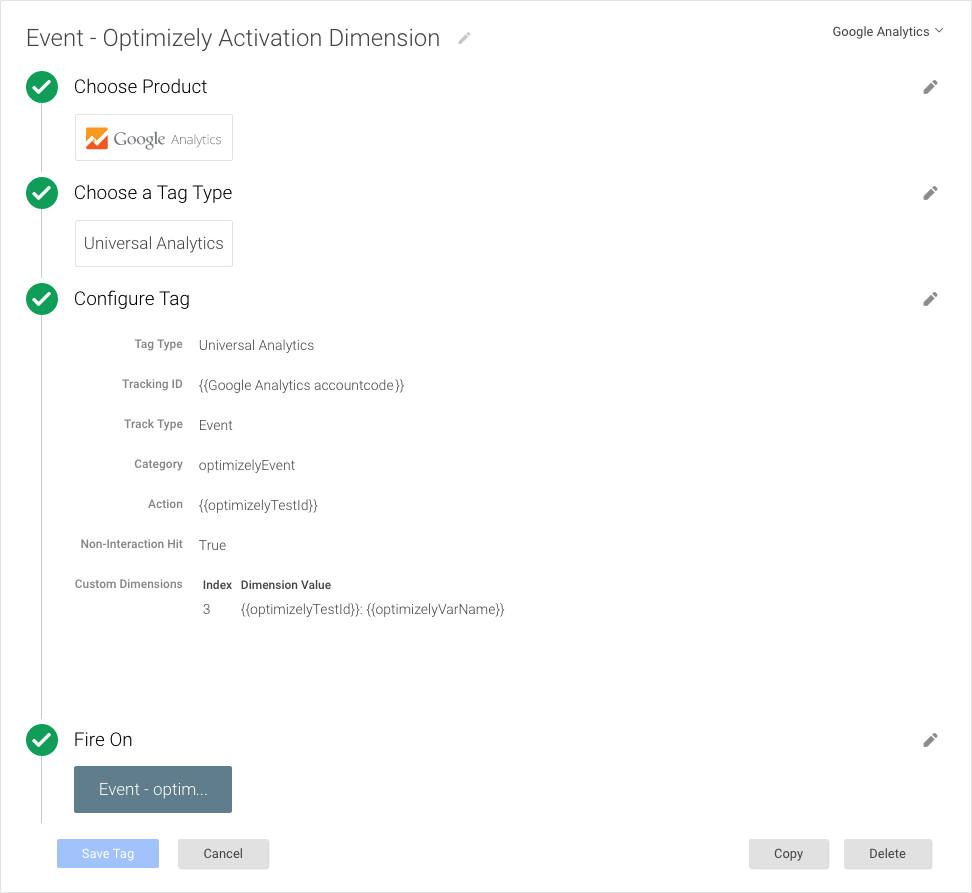
This tag is where the magic happens; essentially, this is a regular GA event. For easy reference, call the category optimizelyEvent and add the testID variable as the event action. Now, when you test if everything works, you should see the events in GA’s real-time view, you won’t have to wait for the dimensions to be applied.
The most important part is the custom dimension: set the index to the number you set in your GA Admin. The value could be anything, I like to use {{optimizelyTestID}}: {{optimizelyVarName}}, which results in an easy to filter dimension. Remember to fire this tag on the Optimizely event you created earlier. You now have a custom dimension filled with your test ID’s and the variation the users saw. Filtering and creating custom reports is instantly much easier, and you can plot lines like the Analytics Guru you are.
Possible issues
If you run in to problems, it might be because this method has some caveats:
- if you have troubles finding the testID in optimizely, go to a test’s results page and check the URL.
- The tags should run after the Optimizely object is filled, because Optimizely is loaded in the head of the page, and GTM is loaded at the beginning of the body. If you have timing issues, or advanced tests that use either the Optimizely API or JS triggering you’ll have to delay the firing of the first tag. You can either do this by firing the tag on a timer, or changing the tag code to wait for the DOM to be ready. If you’re using advanced triggering, I assume you know what to do…
- Only the first active test is used in the script. For 99% of you, that should work fine, as you’re probably not running multiple tests on the same page (why would you?). If you need multiple tests you will need to create multiple dimensions so data will not get overwritten and you need to create a loop for each
optimizely.activeExperimentsobject.


Leave a Reply
You must be logged in to post a comment.