
Since the upgrade from classic analytics to universal analytics there is one functionality that’s been missing; the option to not override the previous source in Google Analytics. For most of the traffic this is ok, but when looking at service emails like password resets, you don’t want them to steal conversions away from the original sources. With the utm_nooverride solution in Classic Analytics, this behaviour was easy to implement. The solution for Universal Analytics was a little bit harder.
In our case, the client’s password reminder email contained regular utm_tagging like source, medium, and campaign.
Case 1: filters
The first solution uses filters in the Google Analytics view:
- Replace source "password_reminder" with "(direct)"
- Replace medium "password_reminder" with "(none)"
- Replace campaign "password_reminder" with "(direct)"
This seemed to work: when looking at the real-time report the source/medium stayed the same when entering the website through the password reminder e-mail. But… when checking the data later on when it was processed, the sessions were attributed to (direct) / (none). When looking at the filters, this is a logical result, but when considering the default attribution model in Google Analytics (last non-direct click) the session should be attributed to the last known source before the password_reminder session.
So why is this not working? My guess is that the attribution part takes place before Google Analytics processes the filters. In this case, the source/medium is not (direct)/(none) yet when entering the attribution process.
Case 2: Using Google Tag Manager
To make sure the data enters Google Analytics as (direct)/(none) before any attribution or filtering is done there is another solution: setting the source/medium manually. In our case, there could be more than one source which you don’t want to override the previous source. To create a future proof solution we added the parameter icmp to the link. This could be any parameter actually but icmp makes sense as an internal campaign. So for every source that shouldn’t override the previous source, we added this parameter.
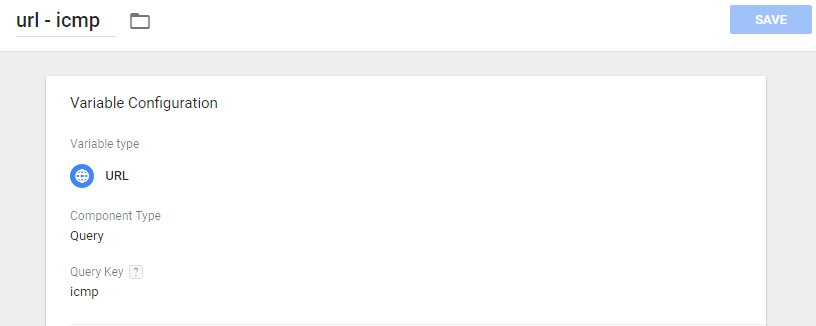
The set-up
First of all, you need to create a variable in Google Tag Manager that contains the value of the icmp parameter.
After creating the variable we can use it to determine if the source/medium should be replaced too (direct)/(none) or not. In our case, we did not use a GTM template to implement Google Analytics tags. In the following paragraph, we will show how to implement the script in a template and in a custom tag.
Custom tag
When using a custom tag to implement Google Analytics you will probably use the code below with some extra options. We call this the core of Google Analytics.
<script>
    (function(i,s,o,g,r,a,m){i['GoogleAnalyticsObject']=r;i[r]=i[r]||function(){
    (i[r].q=i[r].q||[]).push(arguments)},i[r].l=1*new Date();a=s.createElement(o),
    m=s.getElementsByTagName(o)[0];a.async=1;a.src=g;m.parentNode.insertBefore(a,m)
    })(window,document,'script','https://www.google-analytics.com/analytics.js','ga');

    ga('create', 'UA-XXXXX-X', 'auto');
    ga('set', 'anonymizeIp', true);
    ga('set', 'forceSSL', true);

  </script>
To set the source/medium to (direct)/(none) we have to check if the icmp parameter is filled. We use the following code to do so:
  if(typeof {{url - icmp}} !== "undefined"){
        ga('set', 'campaignSource', '(direct)');
        ga('set', 'campaignName', '(direct)');
        ga('set', 'campaignMedium', '(none)');
     }
In this case, when the icmp parameter is set, the utm_source will be set to (direct), the utm_campaign will be set to *(direct) and the utm_medium will be set to (none). If the icmp parameter is not set, the source/medium won’t be changed.
Using a template
When using a template this solution is a little bit harder to implement because you will need two Pageview tags, one that will fire when the URL contains the icmp parameter and another one that fires if that’s not the case.
Regular pageview
Because you are reading this post, I assume you already have set up a default Pageview tag in Google Tag Manager. This would look something like this:
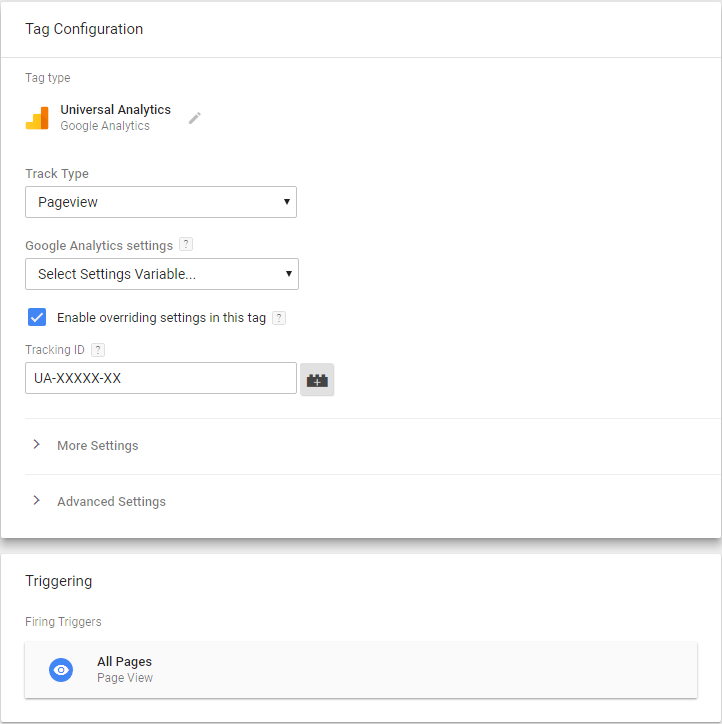
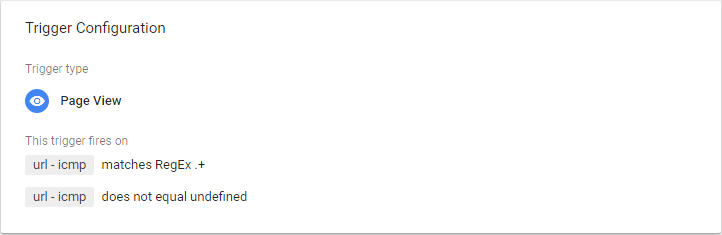
One thing you need to add here is a blocking rule (exception). This rule is needed to make sure you won’t get double pageviews when the icmp parameter is in de URL. The trigger for the blocking rule should look like this.
ICMP pageview
The ICMP pageview looks almost identical to the default Pageview, only in this case we will set some extra fields. To start you can copy the default Pageview. The fields we need to set are the following: campaignSource, campaignName and campaignMedium.
In the end, the Pageview template should look like this:
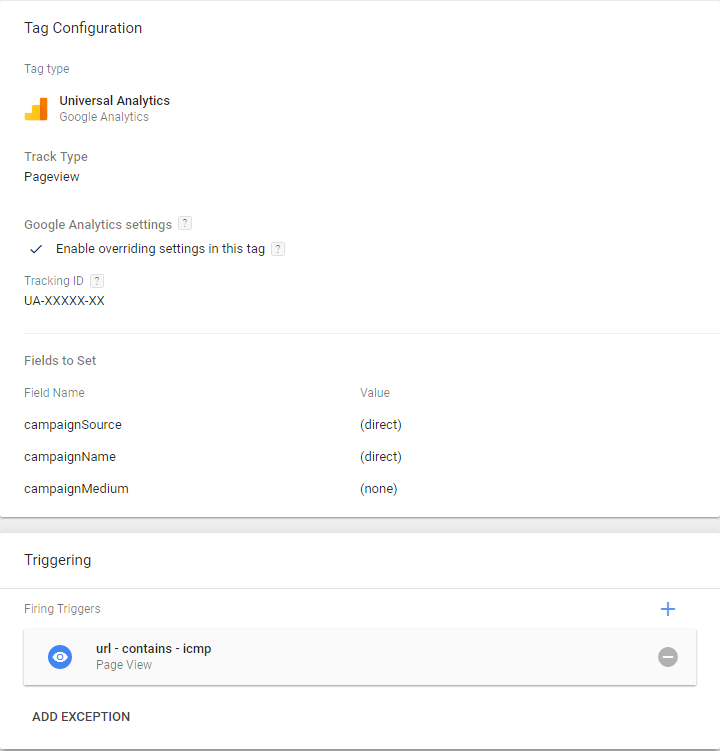
The trigger of the tag should be the same trigger as we used as blocking rule for the default pageview.
Setting the icmp parameter as custom dimension
So now we have set up the proper tags, triggers, and variables to make sure the conversions and eCommerce revenue are attributed to the right source. But.. you still want to know how many users enter the website through the password_reminder email.
In this case, we will send the value of the icmp parameter along with the pageview as a custom dimension. If you used the custom tag solution you can set the custom dimension with this code:
ga('set','dimension1',{{url - icmp}});
When using the template you can set it like this:

If you don’t know how to create custom dimensions in Google Analytics yet, you can find more information here: Create and edit custom dimensions and metrics.
Results in Google Analytics
So, what is the result of these changes in Google Analytics? When you add the icmp custom dimension to the source / medium report you will see how many sessions, conversions and revenue is attributed to another source than the password_reminder source. In this case we selected traffic from google / cpc:

Setting up utm_nooverride for Universal Analytics takes some time but definitely pays off when it comes to the quality of your data.


Leave a Reply
You must be logged in to post a comment.