
Although viewability is not always a guarantee for success, it’s a hot topic in the land of online marketing. We do not only track viewability in our display campaigns to optimise the exposure time of our campaigns, but we also use viewability to see how visitors are using our client’s website and apply personalisation based on that data. Also, the viewability data is used to gather some data and insights for A/B tests. In this post, I’d like to show you the basics of tracking the viewability of an element on a web page.
Track whether an element is in view or not
For this basic example, we use a simple HTML element with an ID of foo with some basic styling applied to it (Fiddle):
<div id="foo" />

  <style>
  #foo {
    border-top: 8px solid #7e4396;
    border-bottom: 8px solid #7e4396;
    width: 336px;
    height: 250px;
    display: block;
    background-color: #f0efef;
  }
  </style>
The most simple approach to check whether an element is in view is to see if there is at least a distance of 0 pixels or more between the top of an element and the top of the viewport, and at least 0 pixels or more between the bottom of an element and the bottom of the viewport.
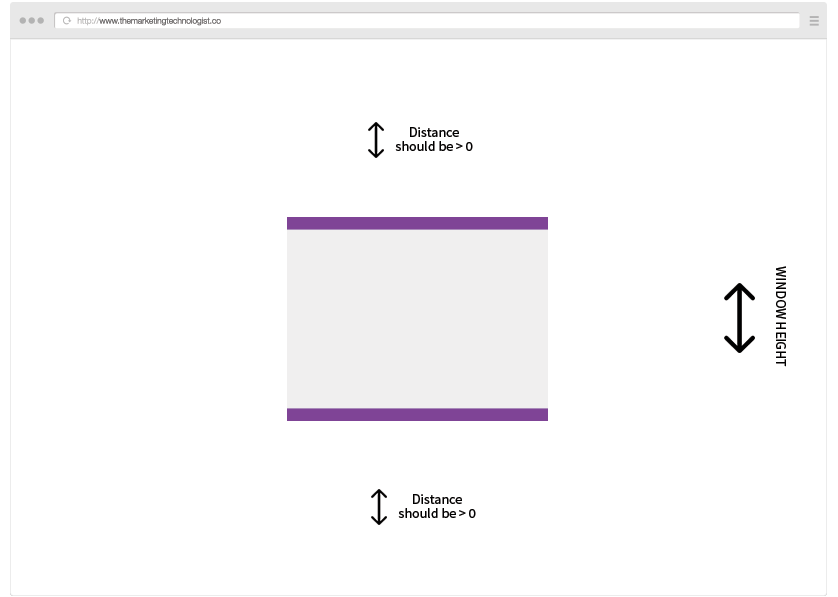
To calculate this, we need to know the position of the element relative to the viewport, the height of the element and the viewport height.
Figuring out the height of the viewport
Because of the differences in the way browser’s layout engines measure the window’s width, we need to check for two properties: window.innerWidth and document.documentElement.clientWidth. Webkit (Chrome and Safari) claims innerWidth is smaller than clientWidth, Trident (Internet Explorer) and Presto (Opera) claim innerWidth is bigger than clientWidth and Gecko (Firefox) claims innerWidth is the same size as clientWidth. To get the correct value in all situations, we can grab the highest value of both by using Math.max:
var stageHeight = Math.max(document.documentElement.clientWidth, window.innerWidth || 0);
getBoundingClientRect()
Now we know the height of the viewport, we need to find the element’s position relative to the viewport. We can use the getBoundingClientRect method for this. The getBoundingClientRect() method returns the size of an element and its position relative to the viewport. Bingo.
// Create a reference to our element
  var element = document.querySelector('#foo');
  // Get the bounding rectangle of our element
  var elementBoundingBox = element.getBoundingClientRect();
We can now add these properties to what we already know:
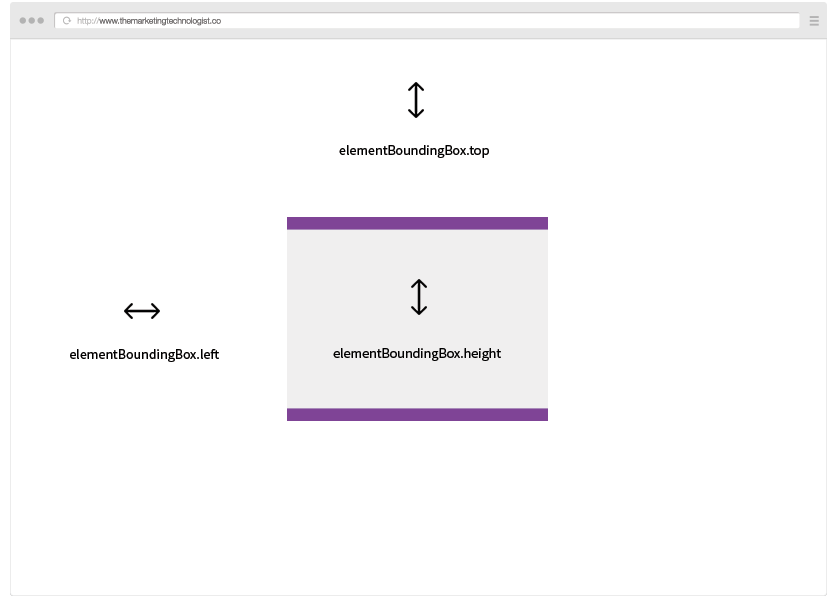
The only missing value is the distance from the element to the viewport’s bottom. We can simply calculate this value by subtracting the sum of the element’s top and height value from the viewport’s height.
var elementsTopY = elementBoundingBox.top;
  var elementsBottomY = elementBoundingBox.top + elementBoundingBox.height;
Combine stageHeight & getBoundingClientRect()
Now that we have all the values we need, we can simple calculate whether our element is 100% in view or not:
var elementIsInView = elementsTopY >= 0 && elementsBottomY < stageHeight;
Before we continue, let’s first wrap our code in a function so we can re-use it later.
function elementIsInView(element, stageHeight) {
    var elementBoundingBox = element.getBoundingClientRect();
    var elementsTopY = elementBoundingBox.top;
    var elementsBottomY = elementBoundingBox.top + elementBoundingBox.height;
    return elementsTopY >= 0 && elementsBottomY < stageHeight;
  }
Update when a user scrolls
If we want to track the viewability of an element when a visitor scrolls the page, we need to track the user’s scroll behaviour. We can do this by listening to the scroll event of the window object.
window.addEventListener("scroll", function(e) {
    // Do something when a user scrolls
    console.log('Scrolling');
  });
So now instead of just logging the word ‘Scrolling’, we want to see if the viewability state of our element has changed. Luckily we’ve just created a function to check the element’s visibility, so we can use that in our scroll event handler:
window.addEventListener("scroll", function(e) {
    if (elementIsInView()) {
      console.log('Our element is viewable');
    } else {
      console.log('Our element is not viewable');
    }
  });
This works, but the only problem is that the check is only executed after the visitor starts scrolling, and not initially when the script in executed on load. We need to change our code just a bit to fix this. First, we need to move (‘extract’) our viewability check call away from the scroll handler. We’ll create a separate function for this.
function updateElementViewabilityMessage() {
    if (elementIsInView()) {
      console.log('Our element is viewable');
    } else {
      console.log('Our element is not viewable');
    }
  }

  window.addEventListener("scroll", updateElementViewabilityMessage);
Now, all we have to do to check the viewability when the page loads, is calling the updateElementViewabilityMessage function manually. Like this:
updateElementViewabilityMessage();
Debouncing the scroll event
The scroll event is triggered very often, which can make your viewability script’s performance pretty bad, especially when you execute some complex or DOM manipulation in your handler. We can fix this by debouncing (also referred to as throttling) the scroll event. We can use this small throttle method:
var debounce = function(i, t, e) {
      e = e || window;
      var n = !1,
        o = function() {
          n || (n = !0, requestAnimationFrame(function() {
            e.dispatchEvent(new CustomEvent(t)), n = !1
          }))
        };
      e.addEventListener(i, o)
    };

  debounce("scroll", "optimizedScroll", window);
Now, instead of listening to the scroll event, we listen to the optimizedScroll event:
window.addEventListener("optimizedScroll", updateElementViewabilityMessage);
Storing the data
With the example described in this post, you can perform any action when an element enters or leaves the browser’s viewport. Most of the time, you also want to store the data for later analysis and campaign optimisation, like ads or websites based on the data. Especially when used in display campaigns, the amount of data can become enormous. We store our data using Snowplow to an Amazon S3 bucket. Our data scientist can perform analysis on this raw data.
If you don’t have the ability to create an advanced setup like this, or you don’t expect that much traffic, you could also try a data collector service like Keen.io. I also like the idea of just sending your viewability data to Google Analytics using the Google Analytics Measurement Protocol.
A note on viewability in display ads
In this post, I’ve described the happy flow when tracking viewability. Unfortunately, when you want to track viewability in real world display ads, you run into a lot of limitations and challenges. For example, a lot of display ads are served in an unfriendly iFrame, leaving the ad unable to read the viewport height and access the getBoundingClientRect method. This limitation forces parties that offer viewability data to use weird fallback methods, like using Flash(!!) in ads to measure the frame rate to decide whether an ad is in view or not. Even big players like Appnexus use this technique and are struggling to overcome the limitations. I’ll dive into the specifics and workarounds in a future post.


Leave a Reply
You must be logged in to post a comment.